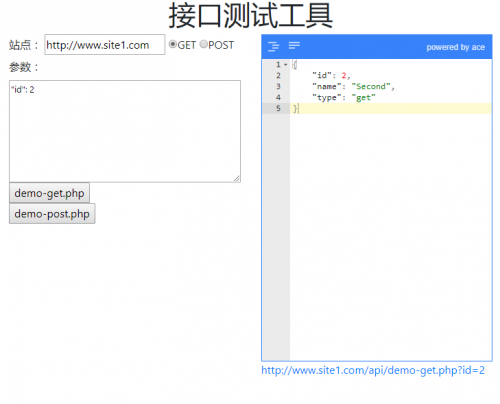
自制REST接口测试工具
随着项目的推进,接口数量也越来越多。
对于功能测试来说,一个个在浏览器地址栏中输入URL是很痛苦的事情。
所以诞生了很多专业的接口(主要针对RESTfull API)数据测试工具。
比如:专用抓包工具fiddler,Chrome插件Postman、Restlet Client、RESTClient,和在线的getman等等。
这些工具功能强大,都能满足需求。
1 新工具特点
不过,我们接下来要做的,是一个更加简易的HTTP接口测试工具。

这个工具有下面几个特点:
- 完全自主定制,可以嵌入项目。
- 高亮显示JSON格式。
- 使用CURL,无跨域问题。
- 基于PHP和JQuery,修改方便。
- 轻便、小巧。
2 目录结构
│ index.php
│ api-curl.php
└─api
    demo-get.php
    demo-post.php
其中:
- index.php:首页文件
- api-curl.php:后端处理文件,根据前端发送的参数和请求方式去请求数据
- api/:模拟的接口
3 前端布局
前端我们直接用Bootstrap来布局。
文件index.php内容:
<html>
    <head>
        <title>接口测试工具</title>
        <meta content="text/html; charset=UTF-8">

        <link href="https://cdn.bootcss.com/bootstrap/4.0.0-beta/css/bootstrap.min.css" rel="stylesheet">
        <link href="https://cdn.bootcss.com/jsoneditor/5.9.6/jsoneditor.min.css" rel="stylesheet">

        <script src="https://cdn.bootcss.com/jquery/3.2.1/jquery.min.js"></script>
        <script src="https://cdn.bootcss.com/jsoneditor/5.9.6/jsoneditor.min.js"></script>
        <script src="https://cdn.bootcss.com/popper.js/1.12.5/umd/popper.min.js"></script>
        <script src="https://cdn.bootcss.com/bootstrap/4.0.0-beta/js/bootstrap.min.js"></script>
   </head>

    <style>
        .base-text, button {cursor: pointer}
        #jsoneditor{height: 80%;}
    </style>

   <body>
      <h1 class="text-center">接口测试工具</h1>

        <div class="container-fluid">
            <div class="row">
                <div class="col">

                    <label for="base-url">站点:</label>
                    <input id="base-url" name="base-url" type="text" class="rd_1 w350" value="http://www.site1.com"
                           required />

                    <label><input type="radio" name="method" checked="checked" value="get" />GET</label>
                    <label><input type="radio" name="method" value="post" />POST</label>
                    <br />

                    <label for="params">参数:</label>
                    <textarea id="params" name="params" class="w-100 small h-25">
"id": 2</textarea>

                    <br />
                    <div class="apis">
                        <?php
                        /**
                         * 这里我们读取api目录下的文件来获得接口列表,在实际情况中,
                         * 比如在MVC框架中,我们可以先获得文件内容,在通过正则方式
                         * 获取具体的接口名称
                         */
                        ?>
                        <?php $files = array_slice(scandir('./api'), 2); ?>
                        <?php foreach ($files as $file) : ?>
                        <div class="api-item">
                            <button data-url="/api/<?= $file ?>"><?= $file ?></button>
                        </div>
                        <?php endforeach; ?>
                    </div>
                </div>

                <div class="col">
                    <div id="jsoneditor"></div>
                    <p><a href="#" target="_blank" id="full-url" class="text-gray"></a></p>
                </div>
            </div>
        </div>

   <script>
        // 初始化JSON编辑器
        var container = document.getElementById("jsoneditor");
        var options = {mode: 'code', indentation: 4};
        var editor = new JSONEditor(container, options);

        // 点击接口
        $('.api-item button').on('click', function() {
            // 高亮
            $('.api-item button').removeClass('current');
            $(this).addClass('current');

            // 获取DOM中的数据
            var base = $('input[name=base-url]').val(),
                api = $(this).attr('data-url'),
                params = '{' + $('#params').val().replace(/\n/g, ',') + '}',
                method = $('input[name=method]:checked').val(),
                href = (method === 'get') ? (base + api + '?' + $.param(JSON.parse(params))) : (base + api);

            // 显示链接
            $('#full-url').attr('href', href).html(href);

            // 获取数据
            $.post(
                'api-curl.php',
                {
                    url: base + api,
                    params: params,
                    method: method
                },
                function(result) {
                    try {
                        var json = JSON.parse(result);
                        editor.set(json);
                    } catch(e) {
                        editor.set({RETURN_INVALID_JSON_STRING: result})
                    }
                }
            );
        });
   </script>

   </body>
</html>
JSON的高亮效果用jsoneditor来完成。
如果数据读取回来的是JSON格式,则在jsoneditor里面直接显示。
如果度回来的不是JSON格式,那么jsoneditor里面显示{RETURN_INVALID_JSON_STRING: result},result为返回内容。
4 CURL处理
后台通过PHP CURL请求数据,解决跨域问题。
文件名api-curl.php:
<?php

$url = $_POST['url'];
$params = json_decode($_POST['params'], JSON_UNESCAPED_UNICODE);
$method = $_POST['method'];

exit(request($url, $params, $method));

/**
 * 根据链接、参数、请求方式获取数据
 * @param $url string 链接
 * @param $params array 参数
 * @param $method string 获取方式,get或者post
 */
function request($url, $params, $method)
{
    $ch = curl_init();
    curl_setopt($ch, CURLOPT_RETURNTRANSFER, 1);
    curl_setopt($ch, CURLOPT_HEADER, 0);

    if ($method === 'get') {
        curl_setopt($ch, CURLOPT_URL, $url . '?' . http_build_query($params));
    } elseif ($method === 'post') {
        curl_setopt($ch, CURLOPT_URL, $url);
        curl_setopt($ch, CURLOPT_POST, 1);
        curl_setopt($ch, CURLOPT_POSTFIELDS, $params);
    }

    $output = curl_exec($ch);
    curl_close($ch);

    return $output;
}
这里我们忽略DELETE、PUT等其他方式的请求,用到自行加上就可以啦。
5 模拟接口数据
我们模拟2个接口数据,一个是POST、一个是GET。
POST方式接口模拟文件api/demo-post.php:
<?php

$arr = [
    1 => '{"id": 1, "name": "First", "type": "post"}',
    2 => '{"id": 2, "name": "Second", "type": "post"}',
    3 => '{"id": 3, "name": "Third", "type": "post"}',
];

$id = isset($_POST['id']) ? $_POST['id'] : 0;

echo isset($arr[$id]) ? $arr[$id] : '';
exit();
GET方式接口模拟文件api/demo-get.php:
<?php

$arr = [
    1 => '{"id": 1, "name": "First", "type": "get"}',
    2 => '{"id": 2, "name": "Second", "type": "get"}',
    3 => '{"id": 3, "name": "Third", "type": "get"}',
];

$id = isset($_GET['id']) ? $_GET['id'] : 0;

echo isset($arr[$id]) ? $arr[$id] : '';
exit();
6 代码下载
完整的代码下载:ApiTest。
很多REST Client是不支持自动化测试RESTful API,也不支持自动生成API文档.
之前习惯用一款名字为 WisdomTool REST Client,支持自动化测试RESTful API,输出精美的测试报告,并且自动生成精美的RESTful API文档。
轻量级的工具,功能却很精悍哦!
https://github.com/wisdomtool/rest-client
不懂